Tuesday, July 31, 2012
 Travel Tuesday - Philadelphia's Reading Market
Two weekends ago, I traveled to Philadelphia and met up with my friend Laura for a girl's weekend. Laura is awesome...in some ways, my complete opposite! She is outgoing and a mom and super-smart and funny. I just love her!
We chose Philadelphia in order to see our friend, Don. The three of us became friends while Laura and I were grad students back in Ohio. Don was an undergraduate (obviously a very cool one in order to be friends with two cool graduate students).
Don was a wonderful host. We ate so well while we were in Philly, which was great, because it rained almost our entire trip.
On Saturday, Laura and I started our day by walking from our hotel to the Reading Terminal Market. The market, which was one a train terminal, is now a super-cool market featuring local food vendors and
restaurant stalls.
There was a little something for everyone; from vegetarian, to French, to Thai to even Peking duck! It was a delight. I especially recommend some of the sweets available at the many Amish stalls; please note that although the market is open seven days a week, the Amish stalls are not open on Sunday.
Of course, we ate at so many other great places as well! A summary:
The Dandelion: This is an upscale pub where Laura and I enjoyed dinner. It was AWESOME! We had great beers, a homemade cheese appetizer and our entrees were out of this world. A must visit.
Alma De Cuba: Did I mention Don was a great host? He treated us to dinner at this fantastic Cuban restaurant. Every one's meal looked great...and the atmosphere was very city chic.
Capogiro Gelato: I have to give this gelato shop a shout out. We found this on Sunday morning and it was such a delightful treat.
Shane Candies: Laura and I took a long walk on Saturday in the rain. We stopped in here and I am glad we did. Lots of homemade chocolates as well as artisinal chocolate from the area and across the country. And the staff were so kind to two waterlogged ladies on a Saturday afternoon.
Don warned us, but it is true...Philadelphia is really a food lovers delight. Have any of you been to Philadelphia lately? If so, what food attractions would you add?
Until next time,

We chose Philadelphia in order to see our friend, Don. The three of us became friends while Laura and I were grad students back in Ohio. Don was an undergraduate (obviously a very cool one in order to be friends with two cool graduate students).
 |
| Don, Laura and yours truly |
Don was a wonderful host. We ate so well while we were in Philly, which was great, because it rained almost our entire trip.
On Saturday, Laura and I started our day by walking from our hotel to the Reading Terminal Market. The market, which was one a train terminal, is now a super-cool market featuring local food vendors and
restaurant stalls.
 |
| Some of the many sights at the Reading Market |
There was a little something for everyone; from vegetarian, to French, to Thai to even Peking duck! It was a delight. I especially recommend some of the sweets available at the many Amish stalls; please note that although the market is open seven days a week, the Amish stalls are not open on Sunday.
 |
Of course, we ate at so many other great places as well! A summary:
The Dandelion: This is an upscale pub where Laura and I enjoyed dinner. It was AWESOME! We had great beers, a homemade cheese appetizer and our entrees were out of this world. A must visit.
Alma De Cuba: Did I mention Don was a great host? He treated us to dinner at this fantastic Cuban restaurant. Every one's meal looked great...and the atmosphere was very city chic.
Capogiro Gelato: I have to give this gelato shop a shout out. We found this on Sunday morning and it was such a delightful treat.
Shane Candies: Laura and I took a long walk on Saturday in the rain. We stopped in here and I am glad we did. Lots of homemade chocolates as well as artisinal chocolate from the area and across the country. And the staff were so kind to two waterlogged ladies on a Saturday afternoon.
Don warned us, but it is true...Philadelphia is really a food lovers delight. Have any of you been to Philadelphia lately? If so, what food attractions would you add?
Until next time,
Sunday, July 22, 2012
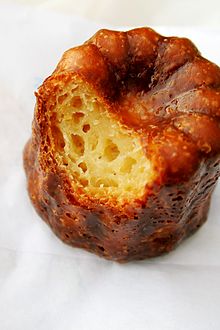
White Chocolate Cannele Mini Cakes

This party is brought to you by Julie and Sophie...Julie was kind enough to send me an email about this contest...thanks Julie!


I first tried a cannele when I visited Paris in June. I went on an awesome food tour and tried this yummy treat, a cannele.
 |
| Source |
I loved it and I love the story behind this Parisian treat. Apparently, originally canneles were made by nuns in French convents. The traditional recipe uses egg yolks, which were donated by wine makers who used egg whites in the wine making process, but had no use for the yolks.
Isn't that pretty neat? Anyway, tonight I decided to try to replicate the treat, but as mini cakes/cupcakes. The original treat is made in special molds. I just have a cupcake pan :)


White Chocolate Cannele Mini Cakes
1/4 c butter
4 oz white chocolate
4 large eggs
4 large eggs
2 T heavy cream
1 t vanilla
1/2 c sugar
1/3 c flour
Preheat your oven to 400.
In a microwave safe bowl, combine the butter and white chocolate. Microwave until the chocolate is fully melted. This took about one minute in my microwave.
While the chocolate is melting, beat the eggs until they lighten just a bit in color, about four minutes. When the chocolate mixture is melted, add to the eggs. Also add the cream, vanilla, sugar and flour until well combined. The batter will be runny; that is OK.
Grease your muffin pan. Add the batter 2/3 of the way full. Bake for approximately 15 minutes. Check for doneness by inserting a toothpick 1/2 inch from the side of the cupcake.
The batter makes approximately nine mini cakes. As your pan probably has room for 12, fill the other three with water. This will allow the mini cakes to cook evenly. I learned this in Home Ec many years ago at Norwich Middle School!
And look at the results...these beautiful, yummy mini cakes. I dusted them with powdered sugar here, but they are wonderful right out of the oven.
Please try these! Perfect for a ladies luncheon or other special event.

Linking up here:

Monday, July 16, 2012
Coconut Get Your Chef On!
I am so excited to be participating in the Coconut Get Your Chef On challenge! A big thanks to Julie and Jen for letting me be involved.

My recipe is a little bit out of the ordinary. I love coconut, but I also love my veggies, so I came up with the ultimate side dish...
COCONUT BEANS
1 lb. sugar snap beans
1 TBLS coconut oil
1/4 c shredded, unsweetened coconut
salt, to taste

First, wash and clean your beans, snipping the ends as needed.

Next, melt the coconut oil in a saute pan. If you don't have coconut oil, please feel free to use butter as a tasty alternative. When the oil is hot, add the beans and begin to saute, stirring frequently.

While the beans are heating, place the coconut in a microwave safe bowl. Heat on High in the microwave for 90 seconds, until toasted. When the beans are heated through, toss the coconut into the pan, until incorporated throughout the beans. Salt to taste.
This could not be easier! It is also a great way to get kids to eat their vegetables. Veggies with coconut? Yes please!

I hope you enjoy this simple and unusual way to incorporate coconut into your diet.
Until Next Time,
Sara
Friday, July 13, 2012
A Trip to Penzey's
Last week, I visited one of my favorite stores...Penzey's!
For those of you not in the Midwest, Penzey's is a premier spice provider in these parts. They are headquartered here in Milwaukee. They also have a great mail order and web store.
Penzey's spices aren't inexpensive, but you are sure to get the highest quality spices available. Penzey's also carries quite a few ethnic spices that you can not find easily elsewhere.
I took a few photos (with their permission)...look how well they style the store! You will love shopping there; I promise! I hope this inspires you to stop by Penzeys to replenish your supply of spices in the near future!


Look how the baking spices are so cutely arranged in a make believe kitchen!
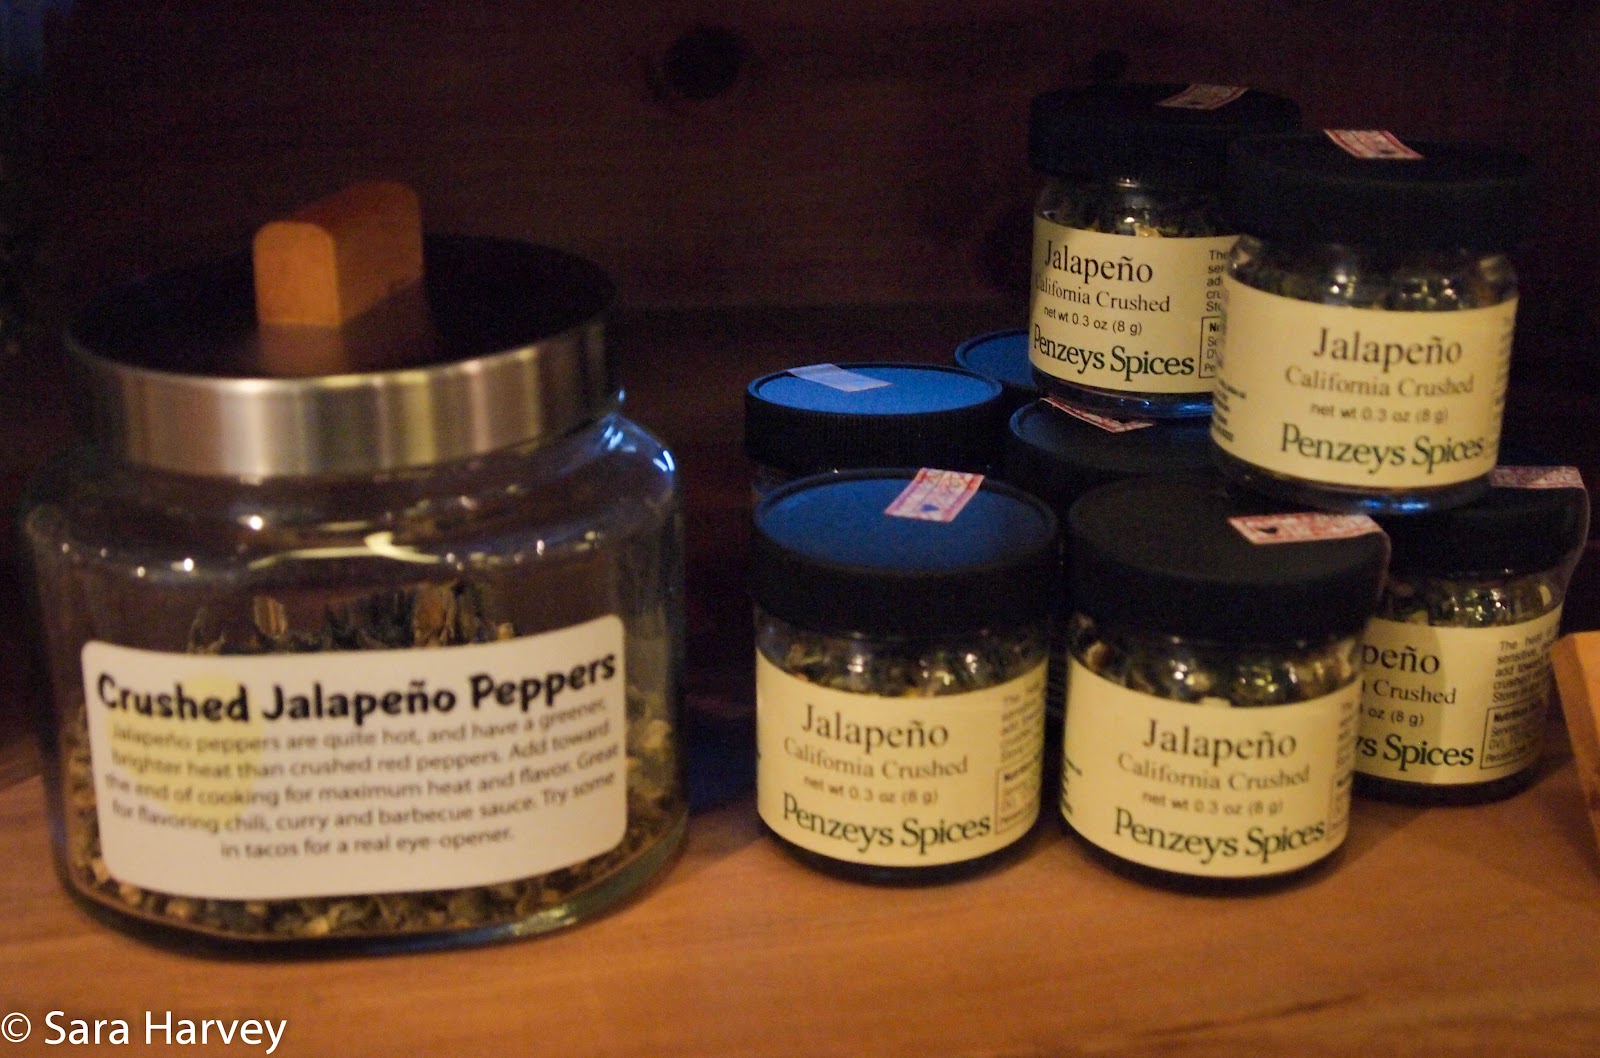
Crushed Jalapeno peppers?!?! I can't wait to try these!

From Soup Bases to Herbs, you will find it all at Penzey's! To find a location near you, check them out!
Until next time,
Sunday, July 8, 2012
Farmer's Market Enchiladas
Every weekend, I visit our local farmer's market in West Allis, Wisconsin. It is one of the best in our area. Right now, there is a TON of zucchini for sale.
I couldn't resist buying some. But what do you do with a boatload of zucchini? That's right, you make zucchini enchiladas!
This is an easy recipe, but it does take a little bit of time between the preparation and the assembly; I usually make this a Sunday night dish. I hope you will too!


Until next time,
Sara
I couldn't resist buying some. But what do you do with a boatload of zucchini? That's right, you make zucchini enchiladas!
This is an easy recipe, but it does take a little bit of time between the preparation and the assembly; I usually make this a Sunday night dish. I hope you will too!


Zucchini Enchiladas
1 TBLS olive oil
1 medium onion, diced
1 yellow pepper, diced
3 c diced zucchini
1 TBLS ground cumin
1 TBLS dried oregano
4 oz can, chopped green chilies, divided
3 TBLS butter
3 TBLS flour
1/2 c chicken broth
3/4 c milk
2 c shredded low-fat cheddar cheese
12 burrito sized tortillas
Preheat the oven to 350 degrees.
Begin by heating the oil in a saute pan. When the oil is hot, add the onion, yellow pepper and zucchini, cooking until soft, about five minutes. Add cumin, oregano and 1/2 the can of the green chilies; toss to distribute evenly throughout what will be the enchilada filling. Remove the filling from the pan and keep warm.
In the same pan, melt the butter. Add the flour and thoroughly stir the flour into the butter; about two minutes or until the mixture slightly darkens. Add the broth and milk and stir constantly; three to four minutes. When the mixture has thickened, add the remaining green chilies and the cheese.
When the cheese has melted, add approximately 1/2 c to the zucchini mixture. Again, stir to distribute the cheese evenly. When this is complete, you can add the filling to the tortillas. Add a few tablespoons of the filling to each tortilla. Arrange the tortillas in a 9 inch by 13 inch pan, seem side down. When you have filled the tortillas and arranged them in the pan, pour the remaining cheese mixture over the enchiladas.
Bake for 30 minutes or until you notice the casserole bubbling. Serve immediately.
This makes 4-6 generous servings...plenty for the entire family!


Until next time,
Sara
Thursday, July 5, 2012
Swiss Chard Saute
I am not a vegetarian, but I really love vegetables and eat vegetarian a few days each week. Cooking without meat is low cost and usually takes less time in the kitchen!
With Swiss Chard being in season, I decided to make one of my favorite quick meals; a Swiss chard saute. This can also be made with spinach, kale or escarole...take your pick! Whatever works for you and your family.

Swiss Chard Saute
1 Tbls olive oil
1 large onion, roughly chopped
1 large bunch of Swiss chard, roughly chopped and stems removed
1/2 cup low-sodium vegetable broth
1 can while beans, rinsed
1/4 teas red pepper flakes
Cooked brown rice, optional
Heat olive oil in a saute pan. When the pan is hot, add the onion and cook until softened, three to five minutes. Add the Swiss chard and broth, cover the pan and let cook until the greens are wilted, about three minutes. Add the beans and pepper flakes. Toss lightly until beans are warmed through. Serve over brown rice, other grain or serve alone as a main or side dish.

I hope you enjoy this and look forward to hearing from you!
Until next time,
Monday, July 2, 2012
Anthology Garland
A few months ago, Bill and I went on a weekend getaway to Madison, Wisconsin. Madison is a favorite of ours; Bill went to school there and it reminds me of where I went to school in Ohio, so we always have a great time.
One store on State Street caught my eye this trip - Anthology. It is this super-cute store with lots of creative, hand-made crafts and sophisticated crafting kits for sale. Sophisticated crafting - yes sir, I'm your kind of gal!
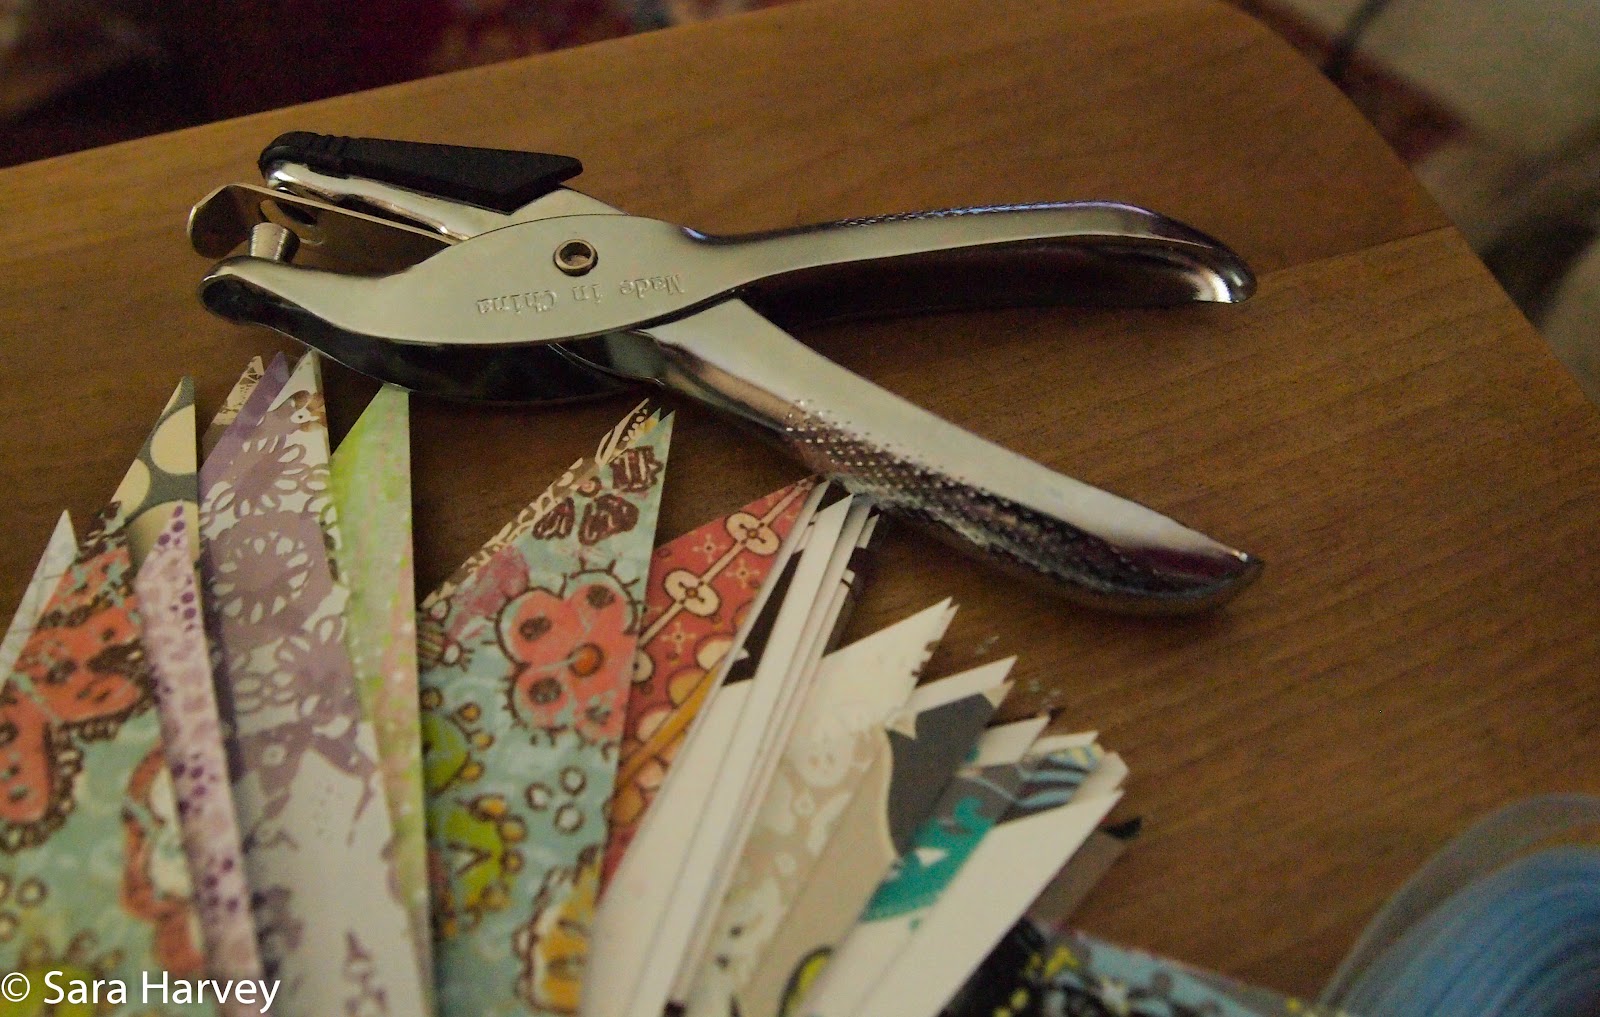
I spent quite a bit of time in their great store and came out with some handmade cards and this...a kit with all of the materials for a pretty paper garland.

The kit made putting it together so easy! All I had to do was punch holes in the triangles and then string them on the ribbon provided.

Ribbon? Guinness heard this and got into the act. It is nice to have such a supportive "helper."

The papers the folks at Anthology chose for this project were so happy and fun...perfect for adding an extra-special 4th of July touch to our breezeway.

And here we go...the final product. How easy was this??? It was a little fun thing to do inside on a hot summer day in Wisconsin. Thanks Anthology and please make sure you stop by their terrific store the next time you are in Madison for a Badger game or other special occasion.

Until next time,
One store on State Street caught my eye this trip - Anthology. It is this super-cute store with lots of creative, hand-made crafts and sophisticated crafting kits for sale. Sophisticated crafting - yes sir, I'm your kind of gal!
I spent quite a bit of time in their great store and came out with some handmade cards and this...a kit with all of the materials for a pretty paper garland.

The kit made putting it together so easy! All I had to do was punch holes in the triangles and then string them on the ribbon provided.
Ribbon? Guinness heard this and got into the act. It is nice to have such a supportive "helper."

The papers the folks at Anthology chose for this project were so happy and fun...perfect for adding an extra-special 4th of July touch to our breezeway.

And here we go...the final product. How easy was this??? It was a little fun thing to do inside on a hot summer day in Wisconsin. Thanks Anthology and please make sure you stop by their terrific store the next time you are in Madison for a Badger game or other special occasion.

Until next time,
Subscribe to:
Posts (Atom)

Sara

Like Me on Facebook
Reader Favorites
-
 Yum! I have been wanting to share this slow cooker recipe to you. Do you have busy week this last week before Christmas? Let this slow co...
 -
Well it is time for another Get Your Chef On Challenge. Thank you to Jen and Julie for hosting. Please check out their blogs to see...
-
 Hello Everyone! I went to the Madison Farmer's Market yesterday (more about this later) and bought these wonderful frozen, handmade mea...
 -
 I recently saw a blog post on another site asking what desserts reminded the reader of their childhood. Immediately, I thought of laz...
